Anatomy of a Terminal Emulator
Originally published November 2021. The terminal emulator fundamentals, ANSI escape codes, and development patterns covered in this comprehensive guide remain current and essential knowledge for terminal application development.
To link to this post, it is advisable to use the preview URL: https://poor.dev/terminal-anatomy
The terminal is a ubiquitous platform that has been fairly stable for many years. There are plenty of resources out there for understanding its inner workings, but most of them are either fairly arcane or offer deep knowledge about a very specific area. This post aims to bridge this gap by offering a gentle and broad introduction to the terminal emulator as a platform for development. If you’re interested in how these concepts apply to building a real terminal application, check out how we built Zellij’s web terminal.
We’ll talk about the different parts of the terminal and how they interact, build a small program to read input from the shell and understand how it’s interpreted, discuss how to create a user interface in the terminal and finally see how we can use all of this to cause some mischief.
I’ve used Rust for code examples, but tried to make them as simple and short as possible so that they’ll also be comprehensible to non-Rust programmers. I also provided explanations of the relevant parts of the code. We refer to the workings of terminal emulators in a unix or unix-like system (eg. Linux and macOS). Some parts might also be relevant to other operating systems.
While this is aimed at those new to developing terminal applications, I tried to go into enough depth in certain areas to keep things interesting for old terminal hounds as well.
Different parts of the terminal
In relation to the terminal emulator, one often hears terms such as “the shell” (or command-line) and pty. Let’s talk a little about all of these and their relationship.
The terminal emulator, as its name suggests, carries with it a lot of history. In this post though, we’re going to concentrate on how things work today. I’ve provided some links for those interested in how things came to be this way at the bottom of this article.
Both the terminal emulator (eg. gnome terminal, alacritty, rxvt-unicode) and the shell (eg. bash, zsh, fish) are executable applications that run on our machine.
The terminal emulator is a graphical application whose role it is to interpret data coming from the shell and display it on screen. This display is often textual but not always.
The shell provides an interface to the operating system, allowing the user to interact with its file-system, run processes and often have access to basic scripting capabilities.
These two programs are connected together by the pty (pseudoterminal) which provides a bi-directional asynchronous communication channel between the two. One channel of the pty represents the communication directed from the terminal emulator to the shell (STDIN) and the other channel refers to the communication directed from the shell to the terminal emulator (STDOUT). When a user types text into the terminal, it is sent to the shell through the pty’s STDIN channel, and when the shell would like to display text to the user on their terminal emulator, it is sent to it through the pty’s STDOUT channel.
The pty has two sides (we will refer to them as “primary” and “secondary”, although the official documentation refers to them by other names). On the primary side is the terminal emulator, and on the secondary side is the shell - though conceivably any program that expects to be connected to a terminal can be opened on the pty’s secondary side (eg. the terminal emulator can open “vim” or “top” directly on the secondary side of the pty when creating it).
Let’s look at an example of how this whole system works:
How does the terminal emulator interpret and display the data from the shell?
When the shell sends text to the terminal, it uses a set of instructions haphazardly gathered over the years under the title “ANSI escape codes”. These are used when the shell needs to send anything that is more involved than clear text (eg. changing colors/styles or moving the cursor). To see how these work exactly, let’s write a small Rust program that spawns a pty and starts the machine’s default shell on its secondary side. Then we can see what the shell sends us.
fn read_from_fd(fd: RawFd) -> Option<Vec<u8>> {
    unimplemented!()
}

fn spawn_pty_with_shell(default_shell: String) -> RawFd {
    unimplemented!()
}

fn main() {
    let default_shell = std::env::var("SHELL")
        .expect("could not find default shell from $SHELL");
    let stdout_fd = spawn_pty_with_shell(default_shell);
    let mut read_buffer = vec![];
    loop {
        match read_from_fd(stdout_fd) {
            Some(mut read_bytes) => {
                read_buffer.append(&mut read_bytes);
            }
            None => {
                println!("{:?}", String::from_utf8(read_buffer).unwrap());
                std::process::exit(0);
            }
        }
    }
}
Here we start by getting the path to the system’s default shell from the SHELL environment variable and start it in a new process on the secondary side of a pty (in a function that we’ll flesh out below).
This function returns the STDOUT file descriptor of the primary side of the pty. We start reading from it in the read_from_fd function (which we’ll also flesh out below). We read until there’s no more data to read (presumably the process ended) and then we print out all the data we’ve read.
Let’s flesh out the spawn_pty_with_shell function:
use nix::pty::forkpty;
use nix::unistd::ForkResult;
use std::os::unix::io::RawFd;
use std::process::Command;

fn spawn_pty_with_shell(default_shell: String) -> RawFd {
    match forkpty(None, None) {
        Ok(fork_pty_res) => {
            let stdout_fd = fork_pty_res.master; // primary
            if let ForkResult::Child = fork_pty_res.fork_result {
                // I'm the secondary part of the pty
                Command::new(&default_shell)
                    .spawn()
                    .expect("failed to spawn");
                std::thread::sleep(std::time::Duration::from_millis(2000));
                std::process::exit(0);
            }
            stdout_fd
        }
        Err(e) => {
            panic!("failed to fork {:?}", e);
        }
    }
}
forkpty is a libc function that forks the current process, starts a pty and places the child part of the fork on the secondary side of the pty. We use the excellent nix wrapper around the bare C function to deal with any unsafe code for us.
The code on the Ok side of the match statement runs in both the parent process (our main program) and the child process. We distinguish between the two by the ForkResult, and so in the child process, we run the default shell, sleep for 2 seconds to let it load and then exit. In the parent process, we return the stdout file descriptor to the program so that it can read what information the child sends it.
Now, let’s flesh out the read_from_fd function:
use nix::unistd::read;

fn read_from_fd(fd: RawFd) -> Option<Vec<u8>> {
    // https://linux.die.net/man/7/pipe
    let mut read_buffer = [0; 65536];
    let read_result = read(fd, &mut read_buffer);
    match read_result {
        Ok(bytes_read) => Some(read_buffer[..bytes_read].to_vec()),
        Err(_e) => None,
    }
}
Here we accept the file descriptor that we got from the spawn_pty_with_shell function above. We send it to the read system call along with a mutable buffer. This will read up to that amount of bytes (65536 in our case), place them in the buffer we gave it, and return us the number of bytes read.
Assuming a successful read, we then allocate a vector from the read portion of our read_buffer and return it to our main program.
Here’s the full source for this program
Running this program, we get the following output:
^[(B^[[m\r^[[KWelcome to fish, the friendly interactive shell\r\n^[]0;fish /home/aram^[[m^[[97m^[[46m⋊>^[[m^[[33m ~^[[m^[[K^[[67C^[[38;2;85;85;85m10:21:15^[[m\r^[[5C
Almost readable, right? This is the initial output of my default shell, fish.
It’s plain text with a smattering of those “ANSI escape codes” we talked about at the beginning of this section.
Let’s take a dive and see how we as a terminal emulator would interpret it. Note that the ^[ character is used here for convenience to denote an ASCII escape character.
This is a slightly redacted output. The actual output given by the fish shell includes some repetitions and instructions that I felt weren’t relevant to this post.
This is a pretty simple example, but any textual interface that runs in the terminal - regardless of which language it was written in - works in this way.
One can even send these instructions directly to one’s own terminal using the echo command. Go ahead and try this out:
echo -e "I am some \033[38;5;9mred text!"
“033” is the octal representation of the ASCII escape character.
Just for fun, let’s look at a more involved example. Here’s a big lump of text that was meticulously prepared just for this purpose:
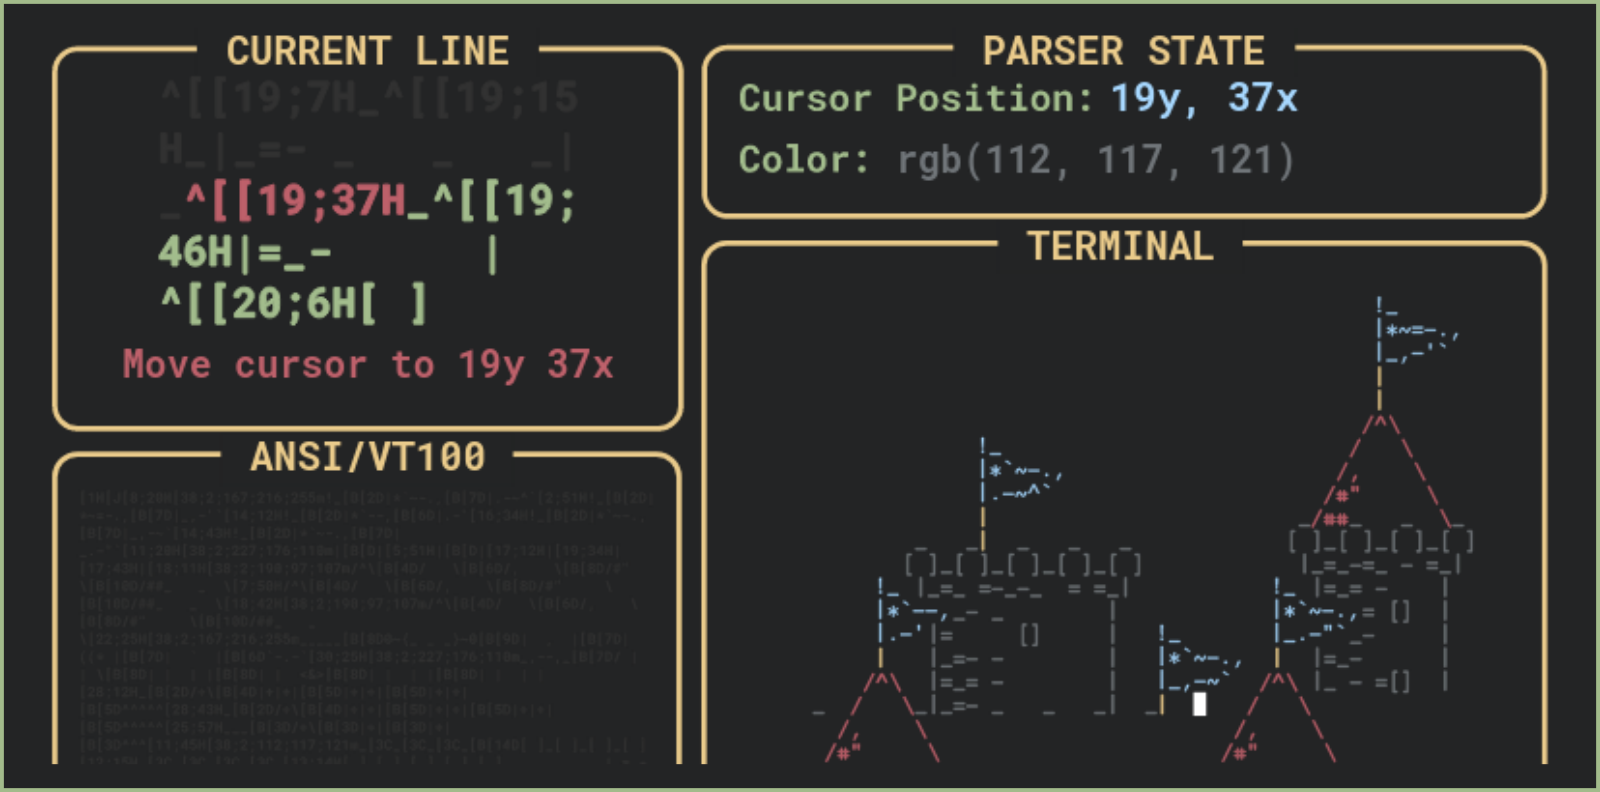
[1H[J[8;20H[38;2;167;216;255m!_[B[2D|*`~-.,[B[7D|.-~^`[2;51H!_[B[2D|*~=-.,[B[7D|_,-'`[14;12H!_[B[2D|*`--,[B[6D|.-'[16;34H!_[B[2D|*`~-.,[B[7D|_,-~`[14;43H!_[B[2D|*`~-.,[B[7D|_.-"`[11;20H[38;2;227;176;110m|[B[D|[5;51H|[B[D|[17;12H|[19;34H|[17;43H|[18;11H[38;2;190;97;107m/^\[B[4D/ \[B[6D/, \[B[8D/#" \[B[10D/##_ _ \[7;50H/^\[B[4D/ \[B[6D/, \[B[8D/#" \[B[10D/##_ _ \[18;42H[38;2;190;97;107m/^\[B[4D/ \[B[6D/, \[B[8D/#" \[B[10D/##_ _ \[22;25H[38;2;167;216;255m_____[B[8D0~{_ _ _}~0[B[9D| , |[B[7D| ((* |[B[7D| ` |[B[6D`-.-`[30;25H[38;2;227;176;110m_,--,_[B[7D/ | | \[B[8D| | | |[B[8D| | <&>[B[8D| | | |[B[8D| | | |[28;12H_[B[2D/+\[B[4D|+|+|[B[5D|+|+|[B[5D|+|+|[B[5D^^^^^[28;43H_[B[2D/+\[B[4D|+|+|[B[5D|+|+|[B[5D|+|+|[B[5D^^^^^[25;57H___[B[3D/+\[B[3D|+|[B[3D|+|[B[3D^^^[11;45H[38;2;112;117;121m_[3C_[3C_[3C_[B[14D[ ]_[ ]_[ ]_[ ][12;15H_[3C_[3C_[3C_[3C_[13;14H[ ]_[ ]_[ ]_[ ]_[ ] |_=_-=_ - =_|[14;15H|_=_ =-_-_ = =_|[14;46H|=_= - |[15;18H_- _ |[15;50H= [] |[16;16H|= [] |[16;49H_- |[17;16H|_=- - |[17;46H|=_- |[18;16H|=_= - |[18;46H|_ - =[] |[19;7H_[19;15H_|_=- _ _ _| _[19;37H_[19;46H|=_- |[20;6H[ ][20;16H[ ]_[ ]_[ ]_[ ]_[ ]_[ ]_[20;47H[ ]=- |[21;7H|[21;17H_=-___=__=__- =-_ -=_[21;48H| _ [] |[22;6H_[3C_[3C_[3C_-_ =[22;37H_[3C_[3C_[3C_ - |\[23;5H[ ]_[ ]_[ ]_[ ]=_[23;36H[ ]_[ ]_[ ]_[ ]=- | \[24;5H|_=__-_=-_ =_|-=_[24;36H|_=-___-_ =-__|_ | \[25;6H| _- =- |-_[25;37H|= _= | - |[3C\[26;6H|= -_= |= _[26;37H|_-=_ |=_ |[3C|[27;6H| =_ - |_ = _[27;37H| =_ = = |=_- |[3C|[28;6H|-_=-[28;18H|=_ = |=_= -[28;49H| = |[3C|[29;6H|=_-[29;18H| -= |_=-[29;49H|=_ |[3C|[30;6H|=_[30;18H|= - -[30;37H|_=[30;49H| -_ |= |[31;6H| -[31;18H|-_=[31;37H|=_[31;49H|-=_ |_-/[32;6H|=_=[32;18H| =_=[32;37H|_-[32;49H|_ = |=/[33;6H| _[33;18H|= -[33;37H|=_=[33;49H|_=- |/[34;6H|=_ = | =_-_[34;37H| =_ | -_ |[35;6H|_=-_ |=_=[35;37H|=_= |=- |[36;1H[38;2;163;189;141m^^^^^^^^^^`^`^^`^`^`^^^""""""""^`^^``^^`^^`^^`^`^``^`^``^``^^
Let’s see how the terminal emulator would interpret it:
Black and white ASCII art taken from: https://www.asciiart.eu/buildings-and-places/castles
Since this sort of output is (pretty much) standardized across all terminal emulators, one could take the source of this animation and cat it into any terminal of sufficient size to get this same castle. Unfortunately, copy/pasting the text from above will not work, since the web is not very good at displaying ASCII escape characters. But have no fear, here’s the raw source if you’d like to play around with it.
ANSI escape codes have many different types. But generally fall under CSI (Control Sequence Introducers), OSC (Operating System Commands) or direct escape sequences. Covering their grammar and operation is out of scope for this post, but if you’d like to learn more about them there are some good links at the bottom of this post. If there’s demand, I might write a separate article about them in the future.
Drawing a UI in the terminal
There are numerous great UI libraries for developing textual terminal applications for lots of programming languages. Even if electing to use such a library, it’s helpful to understand the underlying operations. Here are a few things to know about how they work.
Special character charset
When we interpreted the fish shell output above, we saw the ^[(B instruction at its beginning. We described this as “change charset to ASCII”. Let’s take a look at another charset commonly referred to as the “special characters” charset. We can switch to this charset with the ^[(0 instruction (or echo -e "\033(0"), after which all text sent to the terminal emulator will be interpreted against that set instead of the standard ASCII.
This set includes Box drawing characters which one can use in order to draw textual interfaces. Let’s look at an example:
$ echo -e "\033(0lqqqk\nx x\nmqqqj"
Gives us:
┌───┐
│   │
└───┘
Once we switched to the “special characters” charset, the characters we entered were interpreted against the special characters table and so we were able to draw a box.
Let’s look at a more involved example
$ echo -en "\033(0\
                            lq \033(BTests \033(0qqqqqk       lq  lq \033(BAssertion error\033(0 qk\n\
                            x             x       x   x                   x\n\
                            x             x       x   x \033(B! Should equal !\033(0  x\n\
                            x \033(B[ #1 Fail ]\033(0 tqqqqqqqu   x                   x\n\
  l                  k      x             x       x   x \033(BLeft: 50\033(0          x\n\
  x\033(B Rerunning in 10s\033(0 tqqqqqqu   \033(B#2 Fail\033(0   x       x   x                   x\n\
  m                  j      x             x       x   x \033(BRight: 48\033(0         x\n\
                            x   \033(B#3 Pass\033(0   x       x   x                   x\n\
                            x             x       x   x \033(B[test.rs line 25]\033(0 x\n\
                            x             x       x   x                   x\n\
                            mqqqqqqqqqqqqqj       mq  mqqqqqqqqqqqqqqqqqqqj\n"
Gives us:
                            ┌─ Tests ─────┐       ┌─  ┌─ Assertion error ─┐
                            │             │       │   │                   │
                            │             │       │   │ ! Should equal !  │
                            │ [ #1 Fail ] ├───────┤   │                   │
  ┌                  ┐      │             │       │   │ Left: 50          │
  │ Rerunning in 10s ├──────┤   #2 Fail   │       │   │                   │
  └                  ┘      │             │       │   │ Right: 48         │
                            │   #3 Pass   │       │   │                   │
                            │             │       │   │ [test.rs line 25] │
                            │             │       │   │                   │
                            └─────────────┘       └─  └───────────────────┘
Here we switch back and forth from the ASCII to the special characters charset.
The table of the characters one can use in this mode:
| char | prints |
|---|---|
| ` | ◆ |
| a | ▒ |
| b | ␉ |
| c | ␌ |
| d | ␍ |
| e | ␊ |
| f | ° |
| g | ± |
| h |  |
| i | ␋ |
| j | ┘ |
| k | ┐ |
| l | ┌ |
| m | └ |
| n | ┼ |
| o | ⎺ |
| p | ⎻ |
| q | ─ |
| r | ⎼ |
| s | ⎽ |
| t | ├ |
| u | ┤ |
| v | ┴ |
| w | ┬ |
| x | │ |
| y | ≤ |
| z | ≥ |
| { | π |
| | | ≠ |
| } | £ |
| ~ | · |
SIGWINCH - responsive UIs in the terminal
In recent years, the web popularized “responsive UIs” - applications that change their interface depending on their window size.
I find that users often play around with the size of their terminal window - either in order to display it near other applications, or in order to display several terminal windows on the same screen at a time. We can use this paradigm and create a really good UX by not only fitting the application to the user’s window, but also conditionally displaying a different UI depending on the window size.
To do this, we can listen to the SIGWINCH signal. This signal is triggered every time a process’s controlling terminal is resized.
Here’s an example of a Rust program that changes its UI depending on the terminal window size:
use nix::pty::Winsize;
use signal_hook::{consts::signal::*, iterator::Signals};
use std::io::prelude::*;

fn get_terminal_size() -> (u16, u16) {
    // rows, columns
    use libc::ioctl;
    use libc::TIOCGWINSZ;

    let mut winsize = Winsize {
        ws_row: 0,
        ws_col: 0,
        ws_xpixel: 0,
        ws_ypixel: 0,
    };

    unsafe { ioctl(1, TIOCGWINSZ, &mut winsize) };
    (winsize.ws_row, winsize.ws_col)
}

fn draw_rect(rows: u16, columns: u16, x: u16, y: u16, middle_text: &str) {
    let top_and_bottom_edge = "q".repeat(columns as usize - 2);
    let blank_middle = " ".repeat(columns as usize - 2);
    for y_index in y..y + rows {
        if y_index == y {
            print!(
                "\u{1b}[{};{}H\u{1b}(0l{}k",
                y_index + 1,
                x,
                top_and_bottom_edge
            );
        } else if y_index == (y + rows) - 1 {
            print!(
                "\u{1b}[{};{}H\u{1b}(0m{}j",
                y_index + 1,
                x,
                top_and_bottom_edge
            );
        } else {
            print!("\u{1b}[{};{}H\u{1b}(0x{}x", y_index + 1, x, blank_middle);
        }
    }
    print!(
        "\u{1b}(B\u{1b}[{};{}H{}",
        y + rows / 2 + 1,
        x + (columns - middle_text.chars().count() as u16) / 2,
        middle_text
    );
}

fn side_by_side_ui(rows: u16, columns: u16, left_text: &str, right_text: &str) {
    let left_rect_rows = rows;
    let left_rect_columns = columns / 2;
    let left_rect_x = 0;
    let left_rect_y = 0;

    let right_rect_rows = rows;
    let right_rect_columns = columns / 2;
    let right_rect_x = (columns / 2) + 1;
    let right_rect_y = 0;

    draw_rect(
        left_rect_rows,
        left_rect_columns,
        left_rect_x,
        left_rect_y,
        left_text,
    );
    draw_rect(
        right_rect_rows,
        right_rect_columns,
        right_rect_x,
        right_rect_y,
        right_text,
    );
}

fn top_and_bottom_ui(rows: u16, columns: u16, top_text: &str, bottom_text: &str) {
    let top_rect_rows = rows / 2;
    let top_rect_columns = columns;
    let top_rect_x = 0;
    let top_rect_y = 0;

    let bottom_rect_rows = rows / 2 + 1;
    let bottom_rect_columns = columns;
    let bottom_rect_x = 0;
    let bottom_rect_y = rows / 2;

    draw_rect(
        top_rect_rows,
        top_rect_columns,
        top_rect_x,
        top_rect_y,
        top_text,
    );
    draw_rect(
        bottom_rect_rows,
        bottom_rect_columns,
        bottom_rect_x,
        bottom_rect_y,
        bottom_text,
    );
}

fn draw_ui() {
    println!("\u{1b}[H\u{1b}[J"); // clear screen
    println!("\u{1b}[?25l"); // hide cursor
    let primary_text = "I am some arbitrary text";
    let secondary_text = "Me too! Here's a shrug emoticon: ¯\\_(ツ)_/¯";
    let min_side_width = std::cmp::max(
        primary_text.chars().count(),
        secondary_text.chars().count()
    ) as u16 + 2; // 2 for the rect borders
    let (rows, columns) = get_terminal_size();
    if columns / 2 > min_side_width {
        side_by_side_ui(rows, columns, primary_text, secondary_text);
    } else if columns > min_side_width {
        top_and_bottom_ui(rows, columns, primary_text, secondary_text);
    } else {
        println!("\u{1b}(BSorry, terminal is too small!")
    }
    let _ = std::io::stdout().flush();
}

fn main() {
    let mut signals = Signals::new(&[
        SIGWINCH,
        SIGTERM,
        SIGINT,
        SIGQUIT,
        SIGHUP
    ]).unwrap();
    draw_ui();
    for signal in signals.forever() {
        match signal {
            SIGWINCH => {
                draw_ui();
            }
            SIGTERM | SIGINT | SIGQUIT | SIGHUP => {
                break;
            }
            _ => unreachable!(),
        }
    }
    println!("\u{1b}[H\u{1b}[J"); // clear screen
    println!("\u{1b}[?25h"); // show cursor
}
In the main function, we’re using the excellent signal-hook crate in order to:
- listen to
SIGWINCH, so that we know when the window size changed - Listen to
SIGTERM,SIGINT,SIGQUITandSIGHUPso that we know when the program should exit - Keep the program running in a loop until one of the above signals is received
We start by drawing the ui, and then we do so again every time we receive the signal.
Every time this happens, we need to find out what the current size of the terminal is, and we do it with an ioctl system call.
Then, we conditionally decide which UI to render based on whether there’s enough room to properly render it or not. The result looks like this:
Here’s the full source for this program
Raw mode
When developing for the terminal, we often wish for finer control over the text the user enters into their terminal and that is available to us through STDIN. Think about this use case for example:
Would you like to quit? [y/n]
As we discussed at the beginning of this post, STDIN is line-buffered by the pty. Meaning the user would have to press ENTER after they entered their one-letter choice in order for us to read it. To get around this problem, we can set the user’s terminal to “raw mode”. This achieves a few things:
- STDIN is read character-by-character
- Echo is disabled
- Special processing of input is disabled (eg. Ctrl-c will no longer send a SIGINT to the terminal)
Here’s a small Rust program that shows how this is done:
use nix::sys::termios;

fn set_raw_mode() {
    let mut tio = termios::tcgetattr(0).expect("could not get terminal attribute");
    termios::cfmakeraw(&mut tio);
    match termios::tcsetattr(0, termios::SetArg::TCSANOW, &tio) {
        Ok(_) => {}
        Err(e) => panic!("error {:?}", e),
    };
}

fn main() {
    set_raw_mode();
    let mut buffer = [0; 1];
    let stdin = io::stdin();
    let mut handle = stdin.lock();
    loop {
        print!("\n\r");
        print!("Would you like to quit [y/n]? ");
        io::stdout().lock().flush().unwrap();
        handle.read_exact(&mut buffer).unwrap();
        if buffer == [121] { // y
            break;
        }
    }
}
We use the termios interface wrapped once again by the excellent nix crate in order to tell the controlling terminal of our process (identified by the 0 file descriptor for stdin, using 1 for stdout would also work here) to switch to raw mode.
Setting the terminal to raw mode is a pretty common practice for terminal applications. Since in raw mode, user input is not echoed back to them, the application itself can mimic this behaviour and do all sorts of things to the input:
- Change its color depending on whether it’s a valid command or not (like in many modern shells)
- Control where it wraps to make it only be displayed inside a particular part of the UI
- React immediately to certain characters in order to control the UI
Here’s the full source for this program
Finally, let’s use all of this to create some mischief!
Remember that tired old mantra “In linux, everything is a file”? Well, so is the pty. We can find our own pty with the ps command without any arguments. Something like this:
$ ps

   PID TTY          TIME CMD
393500 pts/1    00:07:09 pty
393501 pts/1    00:00:03 fish
595419 pts/1    00:00:00 ps
In the TTY column, we see pts/1 which points to /dev/pts/1. That’s our pty. Let’s say hi!
$ echo "Hi!" > /dev/pts/1

Hi!

$
Here, we redirected the STDOUT of the echo command into the STDOUT of the pty. And since this pty is ours, we saw it on screen. Let’s open another terminal window and do the same:
New window:
$ echo "Hi from new window!" > /dev/pts/1
Original window:
Hi from new window!
Pretty cool, we’re getting a whole 80s chat app vibe going on. Let’s see if we can use some of these ANSI escape codes we learned about:
New window:
$ echo -e "Hi\033[10Cthere!" > /dev/pts/1
Original window:
Hi there!
Well would you look at that. Since the STDOUT of the pty is interpreted by the terminal emulator of the original window, we can send it instructions to do stuff and it’ll happily oblige. Here we told it to move the cursor 10 columns forward before printing the second word.
Remember that conversation you keep having with your teammates about security? About how they shouldn’t all be logging into that production server with the same user?
Well. Here’s the ANSI escape code that makes the cursor invisible: \033[?25l. You can try it youself with echo -en "\033?[25l" (to bring it back: echo -en "\033[?25h").
Wouldn’t it be awful if someone would do this to all connected users? Maybe someone using this small bashlet?
for i in $(ls /dev/pts | grep -v ptmx); do echo -en "\033[?25l" > /dev/pts/$i; done
Side note: please do not harass people. I believe we should differentiate situations in which this sort of mischief would be taken in good fun and others in which it would cause anguish or anxiety. As a person who is sometimes prone to anxiety, I urge you: when in doubt, please err on the side of caution and kindness.
Conclusion
In this post we gave a broad overview of the different players involved in the operation of the terminal emulator and how they communicate. We wrote some small Rust programs to demonstrate the capabilities of this platform and showed visual examples of how data is interpreted and displayed on screen.
I hope you learned some new things or deepened your existing knowledge. I also hope you got inspired to dabble your hands in developing for this great platform that has too often, I feel, been relegated to advanced users or a bygone past.
If you liked this content, consider supporting me on Github Sponsors.
Further reading
- The TTY demystified - a great article about the TTY/pty, its history and low level operation in Linux/Unix.
- The Wikipedia page for ANSI escape codes - which offers a basic rundown and explanation of the more common ones.
- Build your own Command Line with ANSI escape codes - a great introductory post about using ANSI escape codes from python
- ANSI escape codes in the VT100 manual - a little bit arcane, but a very helpful resource
Acknowledgements
Thanks to Kunal Mohan, Brooks Rady and Kenji for proofreading this post and offering helpful comments.